I would never suggest that you have to follow all of my programs to the letter, as written, with no wiggle room to change exercises. It's your workout, after all, and you should be able to do whichever exercises you prefer—especially if you're working around an injury or have limited equipment available.
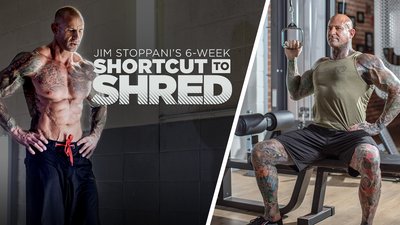
I recently gave you five exercise swaps to utilize with my Shortcut to Size program. Now, I'm giving you the same training hacks for Shortcut to Shred, my popular fat-burning plan.
These five exercises will not only suffice when you're in an equipment pinch, but you might even find a stronger contraction with some (or all of them) for even better results. Give them a try if you're looking to change things up as you go through Shortcut to Shred.
Any way you slice it—or shred it, in this case—you'll be satisfied with the results.
1. Dip: Shortcut to Shred, Weeks 1-6, Day 1
The Swap: Cable Dip
Dips are a great multijoint exercise for building mass in the triceps, particularly when you keep your torso upright as opposed to leaning forward which targets the pecs more than the triceps.
However, bodyweight dips can be difficult if you lack upper-body strength. And the triceps-focused version, which requires the elbows to stay in tight in addition to the torso being upright, can make an already-difficult movement even harder.
Assisted dips are an option here, but not all gyms have that machine. If yours doesn't, consider using the same cable station you would for press-downs. Using cables for dips can help to better focus on the triceps, and it allows you to adjust the weight to make the move easier or harder. Because of this, cable dips come in handy even for those who are strong on standard dips.
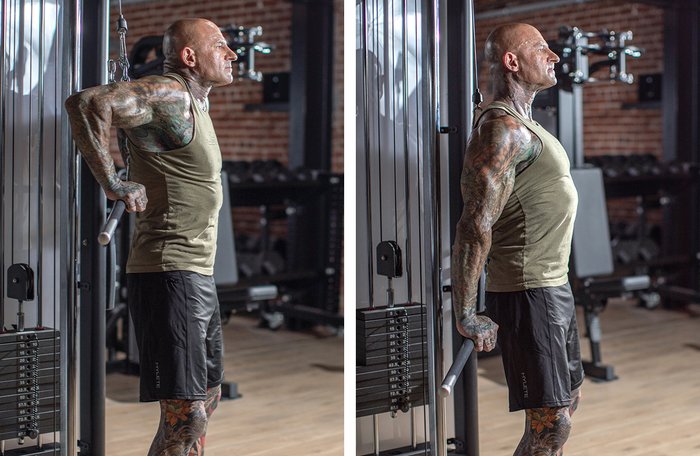
With Shortcut to Shred, your reps on dips vary from 2-5 up to 9-11. If you can't do 9 reps, cable dips allow you to go lighter and fall in the latter range. If your upper body is strong enough, 2-5 dips wouldn't be challenging enough. You could do weighted dips, of course, but maybe you'd prefer not to because of shoulder issues or past injuries. In that case, cable dips offer another way to go heavier and challenge yourself in the 2-5-rep range.
Cable Dip Action Steps:
- Secure a straight-bar attachment to the cable pulley and adjust it to be level with your mid back. If the cable station you're using isn't adjustable up and down the columns (say a lat pull-down station), use an extra length of short chain to hang the bar from or make a chain from several carabiners attached together.
- Stand facing away from the pulley and grasp the bar with a shoulder-width, overhand, open grip. Your upper arms should be behind you and parallel with the floor or higher. If they are below parallel, the bar attachment needs to be adjusted higher.
- Pull your shoulder blades back and together as you contract your triceps to press the heel of your palms down into the bar until your arms are at full extension behind you.
- Hold the bottom position for a full second as you contract your triceps as hard as possible, then slowly allow the bar to raise back up until your upper arms are parallel with the floor again. Repeat for reps.
2. Leg Press: Shortcut to Shred, Weeks 4-6, Day 2
The Swap: Barbell Hack Squat
With the leg press machine, your hips start at a 90-degree angle that decreases throughout the movement, which means there is little extension at the hips and therefore you have limited ham and glute recruitment. The main movement on the leg press happens at the knees, which makes the quads the target muscle group. We want to keep this in mind when we're making a swap for an exercise that elicits a similar result.
You may train at home and not have access to this machine. Or, maybe you're tired of waiting for the only leg press in your gym to free up. Whatever the reason, I have the perfect alternative: the barbell hack squat.

If you haven't tried this exercise, you'll be glad to add it to your repertoire for numerous reasons. Because the barbell is behind you, your center of gravity shifts back, causing less stress on the lower back. This also means there's more emphasis on the quads and less on the hamstrings and glutes—just like the leg press.
Barbell Hack Squat Action Steps:
- Assume a shoulder-width stance with a barbell sitting on the floor behind you.
- Bend your knees and hips to lower yourself and grasp the bar with a shoulder-width grip. Your palms can either be both facing forward or staggered so that one faces forward and the other faces back—whichever you prefer.
- Begin with your back flat (not rounded) and spine in a neutral position, then explosively extend your hips and knees to stand up with the weight, pulling the bar up the backs of your legs.
- Finish in a fully upright position with your shoulders back and chest out, then reverse the motion to return the bar to the floor. Repeat for reps.
- Make sure to keep your back flat throughout the motion, on both the positive and negative portions of each rep.

3. Incline Dumbbell Curl: Shortcut to Shred, Weeks 1-6, Day 6
The Swap: Behind-the-Back Cable Curl
The incline dumbbell curl makes a great exercise to build the biceps peak. When you sit on the incline bench, your arms hang down behind your torso which stretches the long (outer) head of the biceps, the one that makes up the majority of the peak. The biceps long head is the stronger head due to the stretch it's under, and it takes the majority of the load being curled. A muscle in a stretched position can contract with more force.
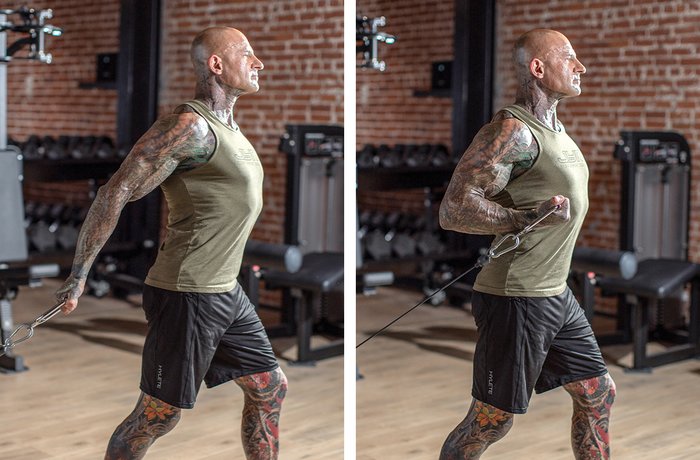
One problem with the incline dumbbell curl, however, is the greater stretch can place undue stress on the shoulders. If that's giving you problems, I highly recommend the behind-the-back cable curl. In my experience, this curling variation puts considerably less stress on the shoulders, while still bringing the arms behind the body to stretch (and target) the biceps long head and accentuate the peak.
Behind-the-Back Cable Curl Action Steps:
- Stand facing 1-2 feet away from a low-pulley cable and take a staggered stance with the same-side leg as the working arm in back.
- With your right hand, grasp a D-handle with an underhand grip and allow your arm to extend behind you at about a 30-degree angle from your torso.
- Keeping your upper arm fixed, curl the handle toward your shoulder.
- Squeeze the contraction hard for a one-second count, then slowly return to the start position.
- Complete all reps with the right arm, then switch to your left and repeat.
4. Behind-the-Neck Lat Pull-Down: Shortcut to Shred, Weeks 4-6, Day 6
The Swap: Single-Arm Lat Pull-Down
Both research and anecdotal reports suggest that behind-the-neck lat pull-downs hit the upper lat muscle fibers better than pull-downs to the front. Arnold Schwarzenegger was a huge proponent of both behind-the-neck pull-downs and pull-ups for back width. Hard to argue with his results.
Science suggests that this is due to the fact that the behind-the-neck version allows the elbows to extend out to the sides more during the pull-down, which better activates the upper lat muscle fibers and the teres major muscle fibers, thus giving the upper back more width.
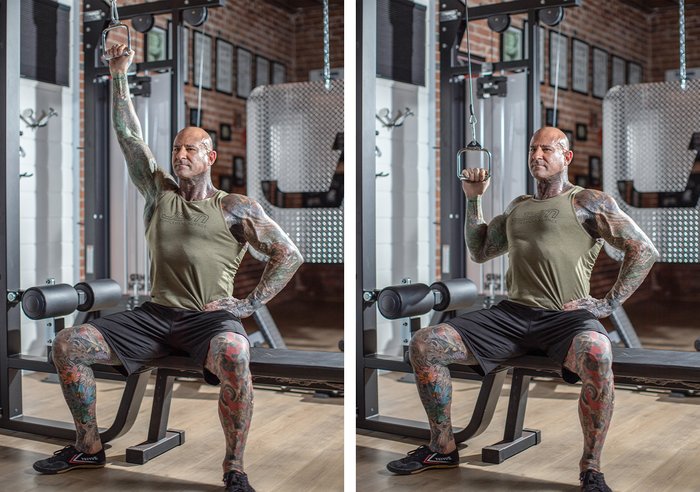
But a big problem with the behind-the-neck version of the pull-down is it causes the upper arm bones to externally rotate while in a compromising position, which can wear heavily on the shoulders. To avoid possible injury, a good alternative is the single-arm lat pull-down because it allows the elbows to flair out to the sides without excessive external rotation on the upper arm.
Single-Arm Lat Pull-Down Action Steps:
- Attach a stirrup or D-handle to a lat pull-down station and set the pin of the weight stack to around half of the resistance you'd normally use for lat pull-downs.
- Sit sideways on the seat (your knees not underneath the pads) and reach up with the arm closer to the machine to grasp the handle in one hand.
- Starting with your working arm fully extended up toward the ceiling, contract your lat muscle on that side to pull the handle straight down.
- When your hand reaches shoulder level, squeeze the contraction in the lat for 1-2 counts, then slowly return to the start (arm-extended) position. Repeat for reps, then switch sides.
5. Cable Oblique Crunch: Shortcut to Shred, Weeks 1-3, Day 4
The Swap: Cable Oblique Push-Down
The cable oblique crunch offers a great way to change the resistance on the external oblique muscles of the midsection. However, one problem with this exercise is that your hand pulls on the handle while you bend at the waist. This can make it difficult to focus on the oblique muscles and many people find themselves pulling too much with the lats and arm muscles instead.

A good alternative is the cable oblique push-down—emphasis on the "push" versus the pull. With this movement, you push down on the handle instead of pulling on it. This makes it easier to focus on the oblique muscles to target that portion of the midsection.
Cable Oblique Push-Down Action Steps:
- Stand sideways next to a cable pulley, holding a stirrup or D-handle in one hand, using a neutral grip with your arm extended straight down by your side.
- Contract your obliques to bend sideways, pushing your arm straight down toward the floor.
- Go down until your hand ends up slightly above knee level or so and hold this position for a second as you contract your oblique muscles as hard as possible.
- Slowly allow your torso to return to the full upright position. Complete reps, then repeat on the other side.
Want unlimited access to all of my programs and an endless supply of content like this? Visit JimStoppani.com and become a member.


